Summaries and the glossary
When summaries are written, the summary settings (engine, four styles, language, interval, safety guardrails), what the line markers mean, Summarize the Rest, and how to write the app-wide glossary and what it affects.
When summaries are written
During a recording, once the number of finished transcript lines set by Summary Interval (6 by default) has built up, those lines are summarized together. With fewer lines, a summary is still written if 60 seconds have passed since the last one and at least 40 characters are waiting.
- Each summary takes at most the Summary Interval’s number of lines. Lines that arrive while a summary is being written go into the next one
- Summaries are written only while Otonota is in the foreground. In the background they wait, and catch up when you return
- Lines not yet summarized when you stop can be summarized with “Summarize the Rest” (below)
Summary settings
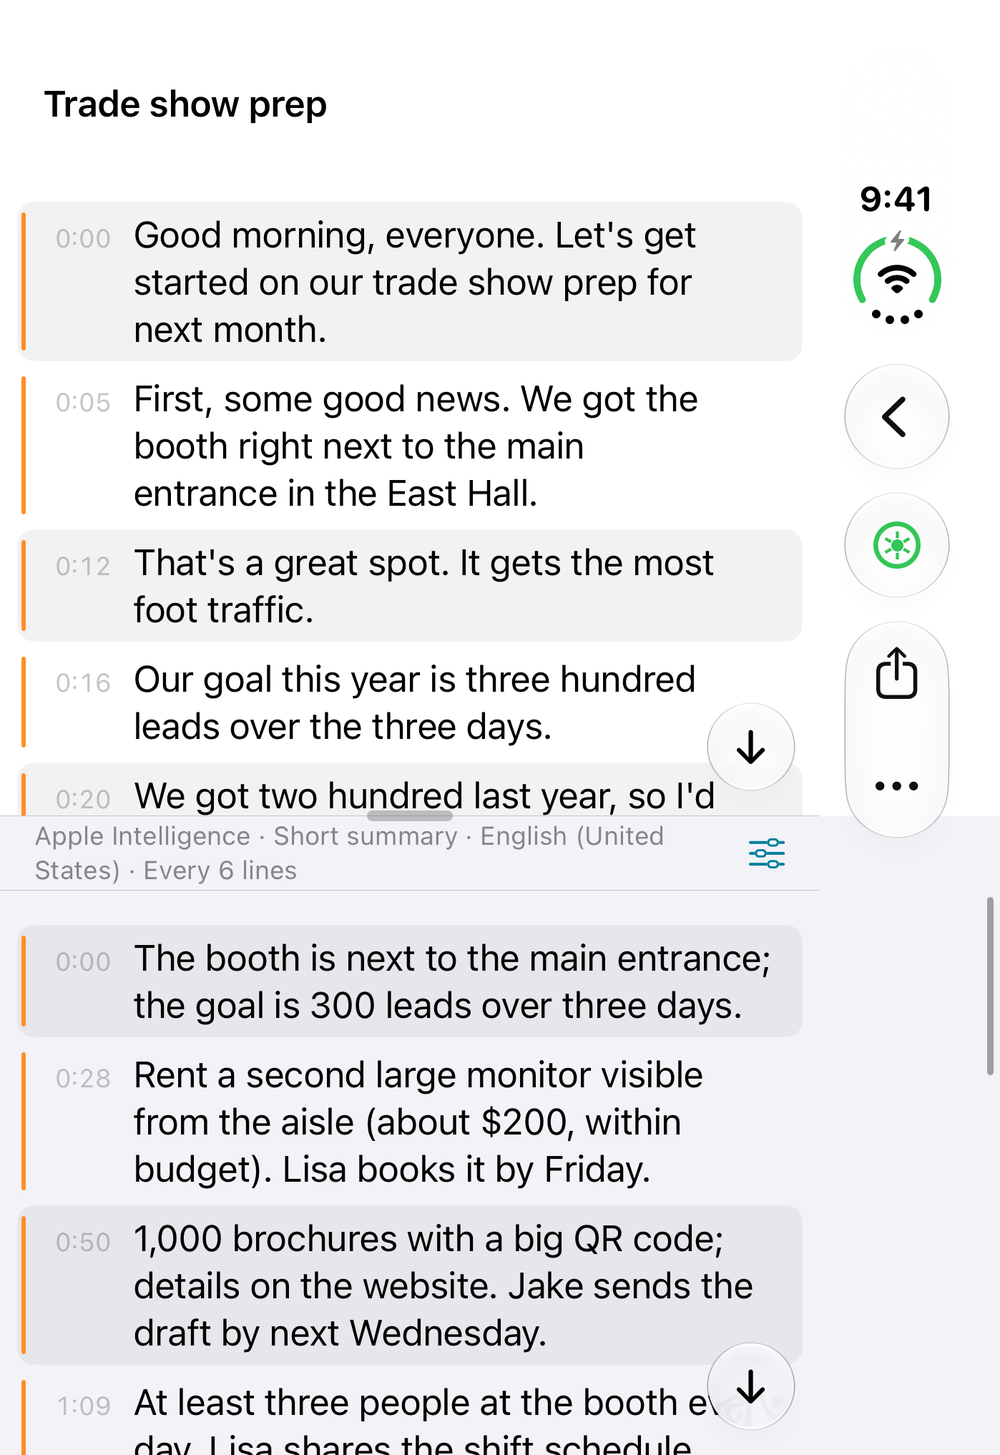
The top of the summary column shows the current summary settings on one line (for example “Short summary · English (United States) · Every 6 lines”; with Pro, the summary engine comes first). When automatic summaries are off, it says “Auto-summary off”.
The Summary Settings button to its right (the sliders) changes them. Changes made during a recording apply from the next summary, and when the engine, style or language differs from the previous summary, a thin divider between summaries shows just what changed (for example “Engine: …”, “Style: …” or “Language: …”). Changing only the interval or automatic summaries doesn’t add a divider.
| Setting | What it does | Default |
|---|---|---|
| Summarize Automatically While Recording | Turn it off and nothing is summarized during the recording; use “Summarize the Rest” afterwards | On |
| Summary Engine Pro | Apple Intelligence or a downloaded MLX model (see Choosing engines and models) | Apple Intelligence |
| Summary Style | Short summary, Conversational summary, Keywords, or Translation | Short summary |
| Summary Language | The language the summary is written in. Pick a different one from the transcript and it translates as it summarizes | Same as Transcription |
| Summary Interval | How many finished lines to collect before each summary. The menu offers every 1, 2, 3, 4, 6, 8, 10, 15 or 20 lines; Settings lets you pick anything from 1 to 20 | Every 6 lines |
The same items are in the Summary section of Settings, which also has Safety Guardrails (below).
Summary styles
| Style | Output | Good for |
|---|---|---|
| Short summary | One line | Following along during the meeting |
| Conversational summary | Two or three sentences in natural spoken language | Reading back later; keeping nuance |
| Keywords | Up to ten key terms | An index of what came up |
| Translation | The text in the Summary Language | Following a foreign-language meeting in your own |
Translation translates rather than summarizes. Set Summary Interval to every line and you get one sentence of translation at a time.
Summary language
Left at “Same as Transcription”, summaries are written in the language being spoken. To follow a Japanese meeting in English, set Summary Language to English: with Short summary, the points of what was said in Japanese appear in English.
If you choose a language Apple Intelligence doesn’t support, the summary column shows why, and summaries stop for the rest of that recording. See Troubleshooting.
Line markers
- Lines in the transcript and summary alternate with a faint background, to keep them apart
- Transcript lines being summarized get a colored outline and a progress indicator. When done, a → flashes at the right edge and the new summary slides into the summary column
- Transcript lines that went into a summary, and the summary itself, get a thin orange stripe on the left; translations get a blue one
- Where Apple Intelligence’s guardrails refuse a passage, a shield and the line “Apple Intelligence’s safety guardrails prevented summarizing this part.” are left in its place, and summaries carry on
Safety Guardrails
Found in the Summary section of Settings, and shown only when the summary engine is Apple Intelligence.
| Value | What it does |
|---|---|
| Relaxed (for summaries and translation) | The default. Judges content the way summarizing and translating text you supply calls for |
| Standard (Apple default) | Apple’s default judgement. Ordinary conversation gets refused more often |
If ordinary meetings keep showing “prevented summarizing this part”, check that it’s set to “Relaxed (for summaries and translation)”. Changes made during a recording apply from the next summary.
“Relaxed” applies only to summaries returned as prose (Short summary, Conversational summary, Translation). Keywords and the meeting wrap-up keep Apple’s default judgement, by Apple’s design. MLX models have no such setting.
Summarize the Rest
When a finished session has lines that haven’t been summarized, a “Summarize the Rest (N lines)” button appears at the end of the summary column. “Summarize the Rest” in the session’s … menu does the same.
- Use it after recording with automatic summaries off, after stopping partway, or when a summary failed
- It uses the current summary settings (engine, style, language, interval)
- It isn’t available during a recording. Stop first
Glossary
Open Glossary in Settings (the loaded glossary’s name and term count appear on the right). One glossary is in use for the whole app, for recordings and imports alike. You can also open it from the settings sheet that appears before recording.
Saving glossaries (Library)
To use a different glossary for each meeting, save them under a name. Use the Library section of the glossary screen:
- Save As… — saves the current glossary to the library under a name
- Load — loads a saved glossary, replacing the current one
- Manage… — rename, edit About this conversation and the terms of, or delete saved glossaries
- Start New (Clear) — empties the current glossary. Unsaved terms are lost, so save first if you want to keep them
- When you go back after changing a loaded glossary, choose Overwrite and Go Back or Go Back Without Saving
Writing it
One term per line: names, company names, technical terms, abbreviations — anything you want spelled right. To add how it’s said, write term(reading); separate several readings with commas.
Kubernetes(k8s,kube)
OKR
CI- Left of the parentheses is the spelling shown on screen; inside is how it’s actually said (a reading, short form, or alternative). Full-width parentheses work too
- Without a reading, one is guessed from the spelling
- English words and abbreviations can be entered as-is. Upper and lower case, full-width and half-width characters, and katakana and hiragana are treated as the same
- Every keystroke is saved. Tap outside a text field to close the keyboard
What it affects
- Spelling in the transcript — in finished lines, terms heard with the same reading or in different capitalization are changed to the spelling you registered. This works with every engine. It never rewrites part of a word
- Recognition hints — “Standard” also gets the glossary as hints for recognition. With “AI (Apple Intelligence)” and WhisperKit, hints have no effect and only the spelling correction applies (in our November 2026 tests, “AI” produced the same transcript with and without hints). For names that keep getting misheard, add the mishearings to the glossary (Getting names right in meeting transcripts)
- Summaries — the glossary goes to summaries and the meeting wrap-up too. Only the first 30 terms are used there, so put the important ones at the top
Changes take effect from the next line, even mid-recording.
Meeting wrap-up Pro
Sums up a whole finished meeting into topics, decisions and open items on one page. Make it with the “Meeting wrap-up” button at the end of the summary column. See Pro (iPhone and iPad).